I've been meaning to rebuild the wheels for this bike, originally I had nice old high flange Shimano 600 wheels with polished Araya rims. However I managed to snap the axle in the rear hub, it was a freewheel style hub with inboard bearings on the drive side so it was not entirely unexpected seeing as I tend to jump off kerbs a lot - also the width of the 7 speed freewheel pushes the bearings about as far in as you can go without going to a modern freehub design. The rims were needed for my
roadster so I just chucked on a random wheelset that I had lying around.
 |
| I rebuilt the hubs and repacked it with some fresh grease |
 |
| The hub on the left is stamped CD which puts it the '78 year, the hub on the right is EG which is '82. There are subtle differences like a ridge between the bearing cup bulge and the middle of the hub body on the EG hub. Also the EG hub has thicker flanges with countersunk spoke holes. |
I managed to pick up a pair of Shimano 600EX hubs that came with the
Airlite, however the rear hub is quite rare being a high flange version of the first freehub designs. The front one was similar to the previous front hub with some subtle differences. This pair was stamped with the date codes EG which dates it to 1982, this puts it right into the
Uniglide era. The advantage of this hub is that the drive side bearings on the rear hub are brought right out near the end of the axle which effectively eliminates problems with broken/bent axles which typically plagues freewheel hubs.
 |
| Shimano 600EX high flange Uniglide hub. Date code reads EG and the drive side bearing cover reads Shimano 6D |
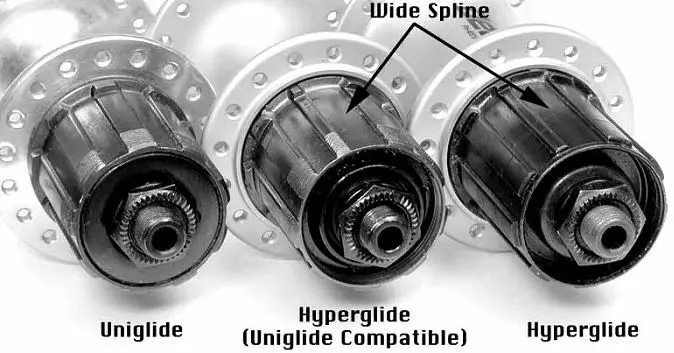
The only problem with the older Uniglide hubs is that the freewheel bodies are not interchangeable like the newer style ones and Uniglide cassettes don't have any shift ramps on the sprockets so you end up with poor shifting under load. Modern Shimano cassettes won't go on these old Uniglide freehubs because they introduced a wide spline to index the sprockets together (for alignment of shifting ramps) so they only solution to adapt them is to file off the tab on the sprocket.
 |
| You can see the wider tab directly to the right of the arrow in the pic |
 |
| This is the sprocket with the tab filed off. Fits nicely on the old Uniglide freehub now. |
With this modification you can basically use any modern sprockets with shifting ramps etc. The only limitation is the smallest sprocket which acts as a lockring, luckily the threading is the same (edit: according to this thread the uniglide thread is ever so slightly smaller than a standard track sprocket threading
http://www.retrobike.co.uk/forum/viewtopic.php?f=12&t=170876&sid=5c4b56f99717a4e14255f4b65aab127d&start=10 ) as track cogs so I got hold of a 13t Dura Ace track sprocket to use for this. The only problem with this is that the spacing behind a track sprocket is 5mm, the spacers typically used for 7/8 speed cassettes is 3mm, so I will have to grind the backside of the track sprocket down to 3mm to match. Also the stack height is a smidgin high as you can see in the pic below, it is only engaging about 3 threads on the freehub. There are about 6 threads in total.
 |
| The cassette on the hub with the track sprocket on. Slight problem. |
 |
| Not much thread left for the locking/small sprocket |
 |
| After a quick cut with the cutting disk, grinding and then sanding... |
 |
| Voila! 3mm spacing |
 |
| Whilst not sitting entirely flush, it's sitting with the correct 3mm spacing now. I might try using thinner 9 speed spacers (2.5mm) to try to get the cassette stack height lower so the lockring will sit properly flush with the freehub body. |
I've given it a test ride and it works like a charm, I'm still a bit paranoid about putting too much force on the top sprocket because the thread might give seeing as it's only engaged on three of them. Now with a cassette hub I have much better choice of gearing and I can more easily customise it to what I want.


0 comments:
Post a Comment